- Level: Beginner
- Pose type: Kneeling · Hip opener
- Body area: Hips · Glutes
- Props: blanket, block, strap
Pigeon Pose: How to Do It, With a Knee-Friendly Figure-4
Sanskrit: Eka Pada Rajakapotasana · say AY-kah PAH-dah rah-jah-kah-poh-TAHS-ah-nah
Quick answer
From hands and knees, slide one knee forward and lower the shin across the mat, then stretch the other leg straight back and keep your hips level, with a folded blanket under the front hip if it floats. If your knee complains or your hips are tight, lie on your back and cross one ankle over the opposite thigh (Reclined Figure-4) instead. Stop if you feel anything in the knee.
We may earn a commission when you buy through links on this page. It never changes what we recommend. As an Amazon Associate we earn from qualifying purchases.
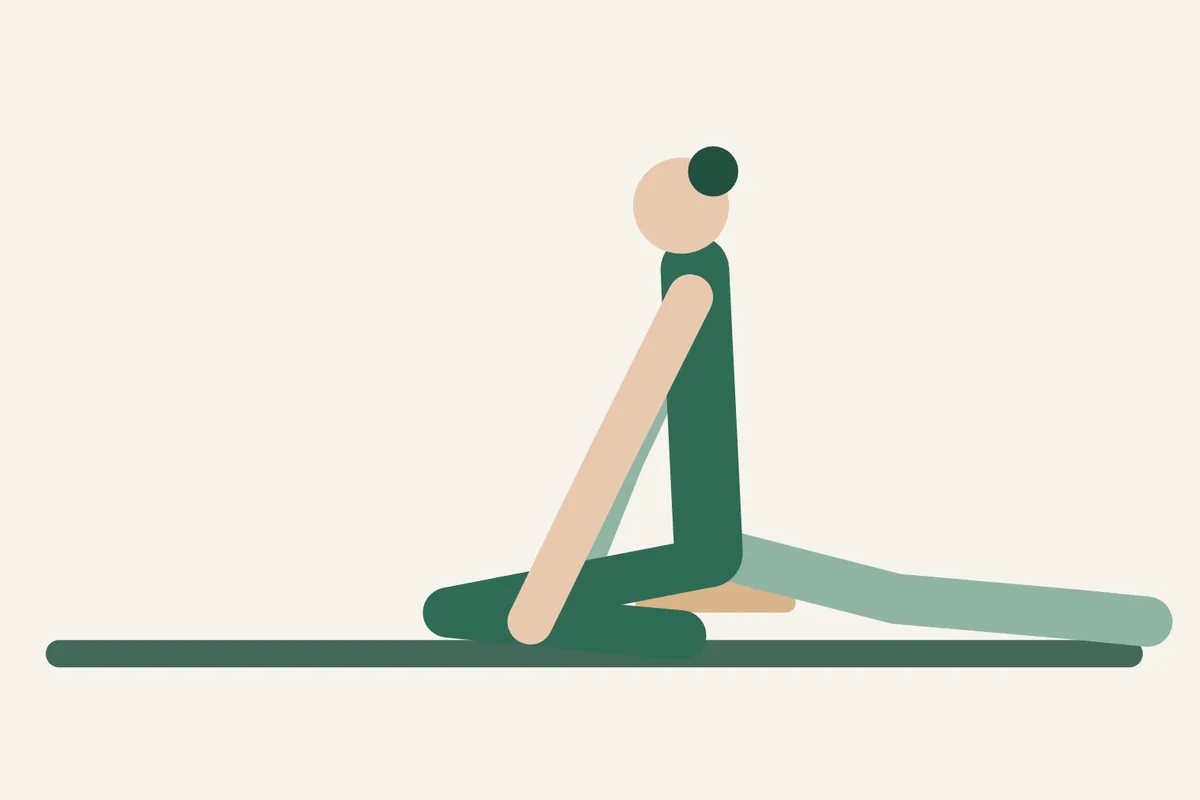
Pigeon pose (Eka Pada Rajakapotasana) is a hip opener. In the beginner version, called half pigeon, one leg is bent in front of you with the shin lowered across the mat, and the other leg stretches straight back along the floor. Teachers describe the stretch as sitting in the outer hip and buttock of the front leg. The pose asks a lot of the front knee, so this guide puts knee safety first and ends with the Reclined Figure-4, a lying version that is gentler on knees and tight hips. It is part of our pose library.
In this guide
- How to do pigeon pose (half pigeon)
- How to protect your knee in pigeon pose
- Common mistakes
- Make it easier (props)
- The gentler option: Reclined Figure-4 (thread the needle)
- Variations
- Poses to do before and after
- Who should skip it or ask a doctor first
- What the research says
- Frequently asked questions
- Sources
How to do pigeon pose (half pigeon)
You need a padded mat, a folded blanket or a block, and a few minutes. Read the knee cues below before you start.
- Come onto your hands and knees. Place your knees under your hips and your hands under your shoulders. If your knees dislike the floor, fold a spare blanket under them.
- Slide your right knee forward, between your hands, and let it fall a little toward the right edge of the mat. The right foot usually lands near the front of your left hip, or closer to you.
- Lower your right shin to the floor at a slant, not squared to the mat’s front edge. The closer your foot sits to your body, the less your knee has to bend and turn. Pick the spot where the knee feels quiet.
- Keep the right ankle straight. Rest the foot on its little-toe side, gently point the foot and draw the toes back toward the shin, and lift the outer ankle a little away from the floor instead of letting it sag. Yoga International warns against letting the foot “sickle” because that strains the ankle and knee.
- Slide your left leg straight back, with the top of the foot on the mat and the toes pointing straight behind you. The back knee, shin and foot all rest on the floor, so pad the back knee if it hurts.
- Check your hips. Both hip points should face the floor and sit level. If your right hip hangs in the air, slide a folded blanket or a block under it until your weight is evenly shared. YogaEasy also suggests padding under the front hip to keep the hips level.
- Stay tall on your fingertips or on blocks. Lengthen your spine and let your chest open. Breathe slowly for about five breaths.
- To leave the pose, press into your hands, tuck your back toes, lift your hips and step back to hands and knees or into Downward Dog. Then repeat on the left side.
If you can stay comfortably, you may fold forward (see “Variations” below). You never have to.
How to protect your knee in pigeon pose
The front knee is where many people feel this pose. Your thigh turns out while the knee bends. A common teaching explanation is that when the hip doesn’t turn out far enough, the knee takes the strain.
- Bring the foot closer. If the knee protests, slide the front foot nearer your hip. YogaEasy advises exactly that: feel the stretch in the hip and nothing in the knee.
- Don’t force the shin square. The shin doesn’t need to lie parallel to the front of the mat, Yoga International says, so a slanted shin is a legitimate version.
- Lift the hip with a prop. A hip that hangs in the air makes the pose lopsided. Put a blanket or block under the front hip until it feels supported, as in step 6.
- No hand-torquing. Don’t use your hands to push the front knee or foot deeper. Yoga International lists this as something to avoid.
- Stop at any knee sensation. A stretch in the buttock is the goal. Pinching, pulling or pain in or near the knee means you leave the pose.
Why does pigeon pose hurt my knee?
We found no study of why, but a common teaching explanation is that the hip can’t turn out as far as the pose asks, so the knee takes the strain. A few things help. Slide the front foot closer, raise the hip on a blanket, or choose the Reclined Figure-4 below, where your body weight doesn’t rest on the bent leg. If the pain is sharp, shows up outside the pose too, or doesn’t settle in a day or two, ask a doctor or physical therapist. Knee injuries are among the conditions the NCCIH says may call for changes in yoga.
Common mistakes
- Chasing a flat, square front shin. It looks tidy in photos, but the knee pays for it. Use the slanted shin.
- Sitting on one hip. If one hip lifts and the other drops, you lose the stretch and the pose becomes lopsided. Use a blanket under the lifted hip.
- Letting the outer front ankle sag to the floor. Keep the ankle straight and the foot active.
- Collapsing into the lower back. If your back sags, walk your hands closer, lengthen up through the front of the body, or raise your hands on blocks.
- Pushing the back leg out at an angle. Keep the back leg straight behind you with the toes pointing back, not rolled out to the side.
- Holding a breath. If you can’t breathe slowly, you are too deep.
- Treating pain as progress. Sharp or pinching pain isn’t a stretch. Come out.
Watch out for: any pain in the knee, a sudden sharp pinch in the hip, or tingling or numbness in the leg. Come out of the pose slowly and use the Reclined Figure-4 instead.
Make it easier (props)
- Folded blanket under the front hip. Raises the floor to your hip so your pelvis stays level. Add layers until your weight feels even.
- Block under the chest or forearms. From an upright position, set a yoga block in front of you and rest your chest, forearms or forehead on it if you fold forward. Use a low or middle height, whichever lets you breathe freely.
- Blocks under your hands. If your hands don’t reach the floor comfortably, blocks bring the floor up to you.
- Strap. A strap helps in the lying version, as described below. See how to use a yoga strap.
- Padding for the knees. Fold a blanket under the back knee, or double the mat.
- Foot closer to the body. This costs nothing and is the first thing teaching sources suggest for a complaining knee.
Helpful gear for this pose
 Manduka Align yoga strap, 8 ft
Cotton strap 1.75 in wide with a zinc-alloy buckle, 8 ft long (maker's spec).
See it on Amazon Manduka cork yoga block
Solid cork, 9 x 6 x 4 in and 2.2 lb, firmer and heavier than foam for steadier support (maker's spec).
See it on Amazon Gaiam foam yoga blocks, pair
Two light foam blocks, 9 x 6 x 4 in each, one for each hand (maker's spec).
See it on Amazon
As an Amazon Associate we earn from qualifying purchases. How we choose gear
The gentler option: Reclined Figure-4 (thread the needle)
Reclined Figure-4 is a lying hip stretch that many teachers offer as a swap for pigeon. Yoga International lists the lying “thread the needle” among the alternatives if pigeon doesn’t feel safe. Your back rests on the floor, so no body weight sits on the bent leg, and you choose how far to pull the thigh in. That is why it suits tight hips and sensitive knees.
- Lie on your back with your knees bent and your feet flat on the floor, hip-width apart.
- Cross your right ankle over your left thigh, just above the knee. Flex the right foot, with the toes pulled back toward the shin.
- Stay here if you feel a stretch already. For more, lift your left foot off the floor and draw your left thigh toward your chest, holding it behind the thigh with both hands, or looping a strap around it.
- Keep your head, neck and shoulders heavy on the floor. If your chin lifts or your shoulders hunch, you are pulling too hard.
- Breathe slowly for about five breaths, then lower the foot and switch sides.
Easier: keep the bottom foot on the floor, or rest it flat on a wall with the knee bent over your hip. Use a strap around the lower thigh if you can’t reach it.
The bottom line: the figure-4 is a fine choice, not a lesser one. It uses the same idea as pigeon, an ankle over the opposite thigh, with far less demand on the knee. For more hip work, see yoga for tight hips.
Is there a chair version?
Yes. Sitting tall on a sturdy chair, you can cross one ankle over the opposite thigh and lean forward a little from the hips. That’s the seated figure-4. We describe it for desk breaks in yoga for desk workers, and it fits into a full chair yoga routine. If you have a hip replacement, ask your surgeon or physical therapist before any figure-4, because it crosses your legs (see the caution box).
Variations
- Pigeon with a forward fold (sleeping or resting pigeon). Walk your hands forward and lower your torso over the front shin, resting on your forearms, a block or your forehead on the floor. Fold only as far as your back stays long and the front hip stays level. Skip the fold if your knee, hip or lower back complains.
- Upright half pigeon. Stay on your fingertips with your chest open. Many beginners find this the easiest version to control.
- Z-sit hip stretch. A seated version in which the front shin is as close as it comes to parallel to the mat and the back leg bends as much as needed. Because the back knee bends and the hips don’t have to square, the front knee takes little load. Yoga International describes it as one that puts no pressure on the front knee.
- Figure-4 against a wall. Lie on your back with your hips near a wall and press the bottom foot against the wall.
Poses to do before and after
- Before: Cat-Cow warms up the spine from the same hands-and-knees start. Low Lunge is another kneeling hip stretch. Downward Dog is the usual way into pigeon.
- After: rest in Child’s Pose, or hug both knees toward your chest on your back. A few slow breaths in Downward Dog also help you step out of the pose.
- Read next: yoga for tight hips, how to use yoga blocks and how long to hold a yoga pose.
Who should skip it or ask a doctor first
- Knee injuries, including a meniscus tear. The NCCIH lists knee and hip injuries among the conditions that may call for changes in yoga. The NHS says a meniscus tear usually happens when you twist your knee. Pigeon bends the front knee while the thigh turns out, so ask your doctor or physical therapist before you try pigeon, and try the Reclined Figure-4 only if it causes no knee pain.
- Hip replacement or recent hip surgery. In a motion-capture study of 20 regular yoga practitioners, pigeon stressed the hip in both flexion and extension (Mears et al., 2018). MedlinePlus lists rules for a new hip, such as not crossing your legs or ankles and avoiding hip flexion past a right angle, especially in the first months. Pigeon turns the knee out and the figure-4 crosses your legs, which conflicts with those rules. Ask your surgeon or physical therapist which poses are safe for you, and when.
- Sacroiliac (SI) joint pain or lower back conditions. If the pose brings pain at the back of your pelvis or in your lower back, stop. The NCCIH names lumbar spine disease among the conditions that may need changes, so check with a clinician first.
- Pregnancy. The NCCIH says you may need to modify yoga during pregnancy, and asks you to be evaluated by your health care provider first. Ask yours whether any hip opener is right for you. The NCCIH advises avoiding yoga poses that involve lying on your back or long periods of being still, and the NHS says to avoid lying flat on your back for more than a few minutes in later pregnancy. Skip the Reclined Figure-4 while pregnant and use the seated chair version if your provider agrees.
- Osteoporosis or low bone density. A study of 89 patients with yoga-related injuries at the Mayo Clinic advised people with osteopenia or osteoporosis to avoid extreme spinal flexion (Lee et al., 2019). Stay upright in pigeon and skip the deep forward fold.
- Any knee, hip or back pain that lasts or gets worse after practice. Stop and ask a doctor or physical therapist.
- Older adults and balance problems. The NCCIH notes that older adults may need to be particularly careful. Use the Reclined Figure-4 or the chair version, and get to the floor and back up with help or a sturdy support.
What the research says
Evidence: no good evidence
We found no trial that tested pigeon pose, or the Reclined Figure-4, for any health benefit, so there is no good evidence either way, and we make no benefit claims for the pose. What exists is one lab study of hip movement and research on stretching in general.
- Hip movement. In 20 healthy, regular yoga practitioners who performed 11 poses, pigeon was among the poses that stressed the hip in flexion and in extension. The authors wrote it to help surgeons advise patients returning to yoga after hip surgery or injury (Mears et al., 2018). It says nothing about benefit.
- Stretching in general. A 2024 meta-analysis of 77 studies found that stretch training increases range of motion in healthy people with a moderate effect compared with controls (Konrad et al., 2024). These studies did not test pigeon pose, so we can’t say the same applies to it.
The steps and prop advice come from yoga teaching sources, not from trials. Treat them as common practice.
Frequently asked questions
Is pigeon pose good for tight hips?
It is a popular choice, and teachers describe it as stretching the outer hip and buttock of the front leg. But no study has tested pigeon pose for tight hips. Stretching in general can increase range of motion in healthy people (Konrad et al., 2024), and that finding isn’t specific to this pose. If your knees are sensitive or your hips are very stiff, the Reclined Figure-4 above is a reasonable starting point. For a full routine, see yoga for tight hips.
How long should you hold pigeon pose?
Start with about five slow breaths on each side. Stay shorter if the pose feels intense, and come out at once if your knee hurts. There is more on timing in how long to hold a yoga pose.
What is the difference between half pigeon and full pigeon?
Half pigeon is the beginner version covered here, with one leg bent in front and the other stretched straight back. Full pigeon (King Pigeon) adds a deep backbend, with the back foot lifted toward the head. It is a much deeper pose and not a step you need to take. Yoga International notes that reaching the foot to the head isn’t necessary, and its author describes it straining her own neck and lower back.
Is pigeon pose safe for beginners?
With props and a slanted shin, many healthy beginners can try half pigeon. It isn’t risk-free for the knee, though. If you have a knee or hip injury, start with the Reclined Figure-4 and ask your doctor or physical therapist. Yoga, like any exercise, can cause injuries. The most common are sprains and strains, and serious injuries are rare, according to the NCCIH.
Should pigeon pose hurt?
No. You may feel a strong stretch in the buttock and outer hip. Pain in the knee, or sharp pain anywhere, is a sign to come out and use an easier version.
Can I do pigeon pose if I can’t sit on the floor?
Yes, in a different form. The seated figure-4 in a chair gives a similar hip stretch without getting down to the floor. See chair yoga and yoga for desk workers.
Sources
- National Center for Complementary and Integrative Health (NCCIH). Yoga: Effectiveness and Safety. Last updated August 2023., checked Nov 21, 2026
- Mears SC, Wilson MR, Mannen EM, Tackett SA, Barnes CL. Position of the Hip in Yoga. J Arthroplasty. 2018;33(7):2306-2311., checked Nov 21, 2026
- MedlinePlus (U.S. National Library of Medicine). Taking care of your new hip joint. Reviewed November 7, 2024., checked Nov 21, 2026
- NHS. Meniscus tear (knee cartilage damage). Page last reviewed September 2, 2026., checked Nov 21, 2026
- NHS. Exercise in pregnancy. Page last reviewed September 24, 2026., checked Nov 21, 2026
- Lee M, Huntoon EA, Sinaki M. Soft Tissue and Bony Injuries Attributed to the Practice of Yoga: A Biomechanical Analysis and Implications for Management. Mayo Clin Proc. 2019;94(3):424-431., checked Nov 21, 2026
- Konrad A, Alizadeh S, Daneshjoo A, et al. Chronic effects of stretching on range of motion with consideration of potential moderating variables: a systematic review with meta-analysis. J Sport Health Sci. 2024;13(2):186-194., checked Nov 21, 2026
- Heagberg K. How to (Comfortably) Do Pigeon Pose: 7 Tips for a More Pleasant Pigeon Pose. Yoga International., checked Nov 21, 2026
- Jacobs LB. Half Pigeon Variation. Yoga International., checked Nov 21, 2026
- YogaEasy Team. Pigeon Pose. YogaEasy. Published August 5, 2020; last modified July 29, 2026., checked Nov 21, 2026
Image credits: Illustration: YogaForFitness (vector figure), drawn from the steps above