- Level: Beginner
- Pose type: Standing · Hip opener
- Body area: Legs · Quadriceps · Hips · Shoulders
- Props: wall, chair
Warrior II (Virabhadrasana II)
Pronounced veer-ah-bah-DRAHS-ah-nah
Quick answer
Stand with your feet wide apart, point your front foot at the short end of the mat and turn your back foot in a little. Bend your front knee until it sits over the ankle, in line with your toes, while your chest faces the long side of the mat and your arms reach out level with your shoulders. Look past your front hand, or straight ahead if your neck is sore.
We may earn a commission when you buy through links on this page. It never changes what we recommend. As an Amazon Associate we earn from qualifying purchases.
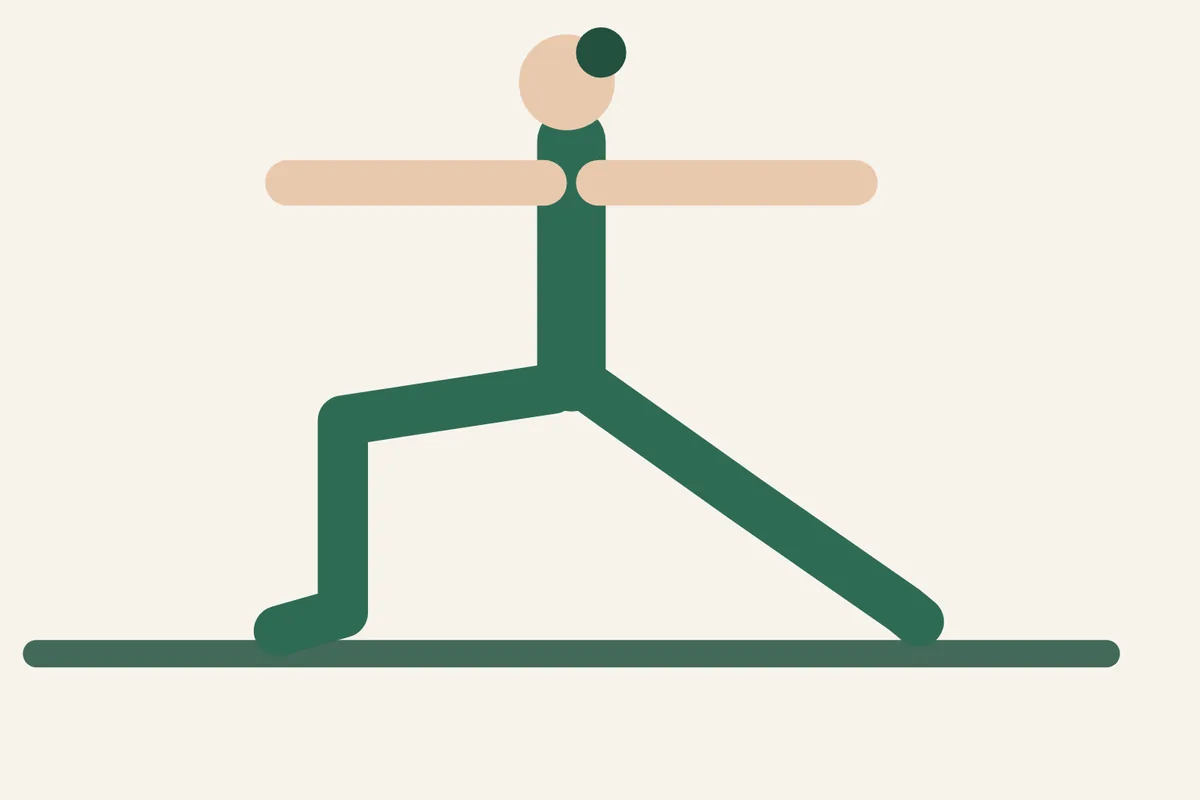
Warrior II is a wide-legged standing pose. One knee bends, the other leg stays straight, and your arms reach away from each other over your legs. Unlike a lunge, your chest doesn’t face your front leg. It faces the long side of the mat, so your legs open out to the sides while your trunk stays upright in the middle.
Most of the pose is decided before you bend your knee: how far apart your feet are, where each foot points, and how your heels line up. This guide covers the stance first, then the knee, hips, arms and gaze, and easier versions with a wall or a chair. It’s part of our pose library. If you’re new to yoga, start with yoga for beginners, where Warrior II joins the plan in week three.
In this guide
How to do Warrior II
- Stand in Mountain Pose in the middle of your mat, then turn to face its long side and step your feet wide apart, toes pointing forward. For a first guess at the distance, step them about one leg-length apart, which is 3 to 4 feet for most adults. With your arms out to the sides, your ankles should be no wider than your wrists. Shorter is fine.
- Rest your hands on your hips. Turn your right foot out a quarter turn, so the toes point at the short end of the mat. Your right leg is now the front leg.
- Turn your left foot in slightly. Its toes now point at the long side of the mat, or a little toward the front. Your left leg is the back leg.
- Look at your heels. The classic line runs from your front heel to the arch of your back foot. If that feels like standing on a tightrope, slide your front foot a few inches toward its little-toe side, so your heels line up or sit a bit wider.
- Press the outer edge of your back foot into the mat and keep that leg straight and firm, without locking the knee.
- Breathe out and bend your right knee until it’s above your ankle, or stop sooner. If the knee travels past the ankle, your feet are too close together for that much bend: step them wider or bend less.
- Glance down at the bent knee. It should aim the same way as your second and third toes. If it has drifted toward your big toe, guide it back out.
- Bring your shoulders back over your hips, so your trunk is upright between your legs and not leaning toward the front knee. Your chest and belly face the long side of the mat.
- Breathe in and lift both arms sideways until they’re level with your shoulders, palms down, one arm over each leg. Let your shoulders drop away from your ears.
- Turn your head and look out past your right middle finger, chin level. If turning bothers your neck, keep looking straight ahead.
- Stay for 3 to 5 slow breaths. To come out, breathe in, straighten your front leg, lower your arms and turn both feet to face the long side again. Repeat with your left foot in front.
Alignment cues
- Stance length: long enough that your bent knee stays over your ankle, short enough that your back leg stays straight and your trunk upright. The American Council on Exercise describes a step of about 3 to 4 feet; longer legs need more.
- Front foot: toes straight toward the short end of the mat, weight spread between the heel and the ball of the foot, big toe down.
- Back foot: parallel to the back edge of the mat or turned in a little, with the outer edge and the heel pressing down. Teachers differ on the exact angle. Choose the one that lets your back knee and hip feel easy.
- Heels: front heel in line with the back arch is the traditional setup. Heel in line with heel, or a little wider, gives you a broader base. It’s a good choice if you wobble, or if your hips feel jammed.
- Front knee: over the ankle and tracking over the middle toes. You should be able to see your big toe on the inside of your knee.
- Hips: open toward the long side of the mat as far as they go without dragging the front knee inward. They don’t need to be perfectly square to the side, and for most people they won’t be (Yoga International).
- Trunk: upright, with your shoulders above your hips and your lower ribs soft, not pushed forward.
- Arms: level with your shoulders. Your back arm tends to sink, so check it now and then.
- Head: turned toward the front hand only as far as your neck is happy to go, with your chin level.
Common mistakes
- Front knee falling inward. This is the one to fix first. When the knee drifts toward the big-toe side, it’s no longer in line with the foot under it. Press down through the ball of your big toe and steer the knee out until it’s over your middle toes again. If it keeps falling in, bend less.
- Forcing the hips square. Trying to make both hip bones face the side wall at any cost usually pulls the front knee in or arches the lower back. Let the back hip come forward a little if that keeps the knee in line.
- Leaning over the front leg. Your trunk follows your reaching arm and tips forward. Bring your shoulders back over your hips.
- A sleepy back leg. The back knee sags, the inner arch rolls down and all your weight lands on the front leg. Straighten the back leg and press through the outer edge of that foot.
- Shrugged shoulders and drooping arms. Lower your shoulders first, then lift your arms back to shoulder height. Rest your hands on your hips when they tire.
- Holding your breath. If you can’t breathe slowly, the pose is too deep or the hold too long. Come up a little.
Watch out for: sharp or pinching pain in either knee, especially along the inner side, or a pinch in the front hip. Straighten the front leg and step your feet closer together. The NCCIH reports that yoga injuries affect the knee or lower leg more often than any other body part, so a sore knee is a reason to stop, not to push on.
Make it easier (props)
- A shorter stance and less bend. Step your feet closer together and bend the front knee only a little. A small bend with the knee in line is a complete Warrior II.
- Hands on your hips. This rests your arms and shoulders. You can also feel with your hands whether your trunk is upright and your pelvis level.
- Back foot against a wall. Stand so the little-toe side of your back foot touches the baseboard, a setup Yoga International suggests for more support. The wall gives your back leg something to press into.
- Your back to a wall. Stand with a wall a few inches behind you, so your shoulders and hips can touch it lightly as you bend your knee. It steadies your balance and shows you when you lean forward.
- A chair under the front thigh. Place a sturdy chair without wheels in the middle of your mat, with the seat facing the long side and all four legs on the mat (Yoga International). Sit on it, then turn your front leg out so that the thigh lies along the seat with the knee over the ankle, and stretch your other leg straight toward the back of the mat. The seat carries part of your weight. For more support, turn the chair so you can hold its backrest, as the American Council on Exercise describes in its guide for older adults. See chair yoga for more seated options.
Helpful gear for this pose
 Manduka begin yoga mat, 5 mm
5 mm TPE mat, 68 x 24 in, light to carry, with a center alignment stripe (maker's spec).
See it on Amazon Gaiam foam yoga blocks, pair
Two light foam blocks, 9 x 6 x 4 in each, to raise the floor under your hands (maker's spec).
See it on Amazon Hugger Mugger cotton D-ring yoga strap, 10 ft
Cotton webbing 1.5 in wide with a metal D-ring buckle, 10 ft long (maker's spec).
See it on Amazon
As an Amazon Associate we earn from qualifying purchases. How we choose gear
Variations
- Palms up. Turn your palms to face the ceiling without lifting your shoulders. The American Council on Exercise offers this option as a shoulder release.
- Moving with the breath. Breathe in and straighten your front leg, breathe out and bend it again, 5 times or so. Many people find this easier than one long hold.
- Reverse Warrior. Keep your legs as they are. Lower your back hand to your back thigh and reach your front arm up and slightly back, so the side of your body lengthens. Don’t lean weight on the back knee.
Poses to do before and after
- Start from: Mountain Pose. Come back to it between sides if your legs need a rest.
- Step in from the floor: from Downward-Facing Dog, bring one foot up between your hands as you would for Low Lunge. Then turn your back heel down, come up and open your chest to the side.
- Warm up first: a few rounds of Cat-Cow. If a wide stance feels stiff, see yoga for tight hips.
- Afterward: stand in Mountain Pose for a few breaths, or rest in Child’s Pose.
- Next standing pose: Tree Pose, which moves your balance onto one leg.
- Read next: how to start yoga at home, mobility vs flexibility and how long to hold a yoga pose.
Who should skip it or ask a doctor first
- Knee pain or a knee injury. The NCCIH includes knee injuries among the health conditions that can mean adapting your practice. In two lab studies, Warrior II put a larger sideways load on the back knee than the other standing poses tested (Wang et al., 2013; Liu et al., 2021). Neither study looked at injuries. Wang’s team suggested the pose may need to be modified or swapped for older adults with knee pain, and Liu’s team noted that the load falls on the inner side of the back knee. A third lab study measured only a small sideways knee load in Warrior II (Whissell et al., 2021), so treat this as a reason for care, not proof of harm. Use a short stance and a small bend, keep the front knee over your middle toes, drop the pose if either knee hurts, and ask your doctor or physical therapist whether it suits your knee.
- Hip pain, hip arthritis or a hip replacement. Hip injuries are on that NCCIH list too. When researchers used motion capture on 20 people who practice yoga regularly, Warrior II was one of the poses that took the hip toward the end of its range in extension (the direction the thigh moves when it goes back behind you). The study was meant to help surgeons advise patients (Mears et al., 2018). The team behind one of the lab studies below advised people with hip pain, hip impingement or hip osteoarthritis to avoid Warrior I and II, above all when the pose itself hurts (Liu et al., 2021). That is the authors’ opinion, not a tested result, but take it seriously: if your hip hurts in the pose, skip it, and ask your doctor or physical therapist before you practice it with hip pain or arthritis. A new hip joint can dislocate if it is moved the wrong way, and you need the most care in the first few months after surgery (MedlinePlus). Check with your surgeon or physical therapist before you try a wide stance.
- Balance problems or dizziness. Balance issues are on the same list. Practice with your back to a wall or a sturdy chair within reach, keep your stance short, and look straight ahead instead of turning your head.
- Severe high blood pressure. The NCCIH lists severe high blood pressure as well. Ask your doctor which poses are right for you and how long to hold them. Whatever you practice, keep breathing steadily and never hold your breath.
- Pregnancy. The NCCIH says to have your health care provider confirm that exercise is safe for you. It also warns against poses where you stay still for a long time. The NHS advises against activities with a risk of falling. A wide stance is far tamer than the sports it has in mind, but keep a wall or chair within reach all the same, hold for only a few breaths and stop if you feel too hot, unwell or uncomfortable. A shorter stance, with your heels wider apart from side to side, gives you a steadier base. If you have pelvic girdle pain, moving your legs apart can make it worse, the NHS notes. Shorten your stance a lot or skip the pose, and ask your midwife or physical therapist. If you need a rest, sit on a chair.
- Lower-back problems. Lumbar spine disease is on the NCCIH list as well. Keep your trunk upright, don’t arch your lower back to square your hips, and ask your doctor or physical therapist first.
- Neck pain. Leave your head facing the long side of the mat and look straight ahead. Turning the head is optional.
- Shoulder pain. Keep your hands on your hips, or lift your arms only as high as is comfortable.
- Older adults. Yoga injuries send people aged 65 and over to the emergency room more often than younger adults, the NCCIH reports, and it advises extra caution at that age. Start with the chair or wall version.
What the research says
Evidence: no good evidence
We found no trial that tested Warrior II by itself for any health benefit, which is why this box is labeled “No good evidence.” What does exist is a handful of small lab studies that measured what the pose demands of the body for a few seconds. They are useful for technique and safety, not as proof of benefit.
- Older adults. Twenty adults with an average age of about 71 were measured in seven standing poses after 32 weeks of twice-weekly yoga classes. The front leg in Warrior II was one of four pose positions with the highest overall demand on the leg muscles. Averaged across those four, the demand was 42% greater than the peak during walking at the person’s own pace. Warrior II also produced the largest sideways loads at the hip and knee: at the back knee, 267% greater than the walking peak (Wang et al., 2013). The authors point out that a walking peak lasts an instant, while a pose is held.
- Yoga instructors. In 11 female instructors holding five standing poses for 10 seconds each, the outer front-thigh muscle of the bent leg worked at about 48% of its maximum in Warrior II, about the same as in Chair Pose (47%). This is one of three front-thigh muscles measured; the other two were less active in Warrior II than in Chair Pose, and none of the differences in muscle activity between poses was statistically significant. The back leg in Warrior II had the highest sideways knee load of all the legs tested, and that difference was significant (Liu et al., 2021).
- How deep experienced teachers bend. Thirteen female yoga teachers bent the front knee to about 68 degrees on average at the deepest point of Warrior II, not the 90 degrees often taught (Whissell et al., 2021).
- Shoulders. In 20 women with yoga experience, Warrior II was one of the poses with low activity in the muscles that steady the shoulder blades: no more than about 16% of their maximum (Chopp-Hurley et al., 2018).
These studies were small and captured single moments. None followed people over time, so they can’t say whether practicing Warrior II makes anyone stronger or healthier. For what trials of whole yoga programs have found, see benefits of yoga.
Frequently asked questions
How long should a beginner hold Warrior II?
Start with 3 to 5 slow breaths on each side, the hold the American Council on Exercise suggests in its guide for older adults. At five or six seconds a breath, that comes to roughly 15 to 30 seconds. If your front thigh shakes or your breath gets short before then, come up, rest in Mountain Pose and go again. More on timing: how long to hold a yoga pose.
Does your front knee have to bend to 90 degrees?
No. A right angle with the thigh parallel to the floor is the textbook picture, but it isn’t a requirement. When researchers measured 13 experienced yoga teachers, their front knees bent to about 68 degrees on average (Whissell et al., 2021). Bend as far as you can while the knee stays over the ankle and in line with your middle toes.
Should your hips be square to the side in Warrior II?
Only roughly. Your chest faces the long side of the mat, and your hips open that way as far as they comfortably can. Yoga International notes that the hips almost never line up exactly with the long edge, and that you’ve turned too far if the front knee drops inward. Keeping the knee in line matters more than square hips.
Why is Warrior II so hard?
Mostly because your bent front leg holds your weight while your arms stay lifted. In the lab studies above, one front-thigh muscle of 11 instructors was about as active in Warrior II as in Chair Pose, although Chair Pose loaded the knee joint itself more (Liu et al., 2021). In the study of older adults, the front leg in Warrior II was among the most demanding positions of the seven standing poses measured (Wang et al., 2013). Shorten the stance, bend less or put your hands on your hips, and build up from there.
Why does my knee hurt in Warrior II?
Often the front knee has fallen inward or moved past the ankle. Check that it is above the ankle and aimed over your middle toes, then try a shorter stance with less bend. If it’s the back knee, try turning the back foot in a little more, and don’t lock the leg. If the pain stays, skip the pose and see a doctor or physical therapist.
What’s the difference between Warrior I and Warrior II?
The legs look similar, but your hips and chest face different ways, and that changes almost everything above the knees.
| Warrior I | Warrior II | |
|---|---|---|
| Hips and chest | Turn toward the front of the mat | Face the long side of the mat |
| Arms | Reach up overhead | Reach out to the sides at shoulder height |
| Back foot | Turned in more, so the hips can turn forward | Parallel to the back edge, or turned in a little |
| Front knee | Bent over the ankle | Bent over the ankle |
In a lab study of 11 yoga instructors, the two poses also loaded the joints differently. At the back knee, Warrior I produced the larger front-to-back bending load and Warrior II the larger sideways load (Liu et al., 2021).
What does Virabhadrasana mean?
Asana means pose, and Virabhadra is a fierce warrior from Hindu mythology. In the story as Yoga International retells it, the grieving god Shiva tears out his hair and creates Virabhadra from it. The “II” simply tells this pose apart from the other warrior poses named after him.
Sources
- National Center for Complementary and Integrative Health (NCCIH). Yoga: Effectiveness and Safety. Last updated August 2023., checked Nov 12, 2026
- Wang MY, Yu SS, Hashish R, Samarawickrame SD, Kazadi L, Greendale GA, Salem G. The biomechanical demands of standing yoga poses in seniors: The Yoga empowers seniors study (YESS). BMC Complement Altern Med. 2013;13:8., checked Nov 12, 2026
- Liu AM, Chu IH, Lin HT, Liang JM, Hsu HT, Wu WL. Training Benefits and Injury Risks of Standing Yoga Applied in Musculoskeletal Problems: Lower Limb Biomechanical Analysis. Int J Environ Res Public Health. 2021;18(16):8402., checked Nov 12, 2026
- Whissell E, Wang L, Li P, Li JX, Wei Z. Biomechanical Characteristics on the Lower Extremity of Three Typical Yoga Manoeuvres. Appl Bionics Biomech. 2021;2021:7464719., checked Nov 12, 2026
- Chopp-Hurley JN, Prophet C, Thistle B, Pollice J, Maly MR. Scapular Muscle Activity During Static Yoga Postures. J Orthop Sports Phys Ther. 2018;48(6):504-509., checked Nov 12, 2026
- Mears SC, Wilson MR, Mannen EM, Tackett SA, Barnes CL. Position of the Hip in Yoga. J Arthroplasty. 2018;33(7):2306-2311., checked Nov 12, 2026
- MedlinePlus (U.S. National Library of Medicine). Taking care of your new hip joint. Reviewed November 7, 2024., checked Nov 12, 2026
- NHS. Exercise in pregnancy. Page last reviewed September 24, 2026., checked Nov 12, 2026
- NHS. Pelvic pain in pregnancy. Page last reviewed December 12, 2022., checked Nov 12, 2026
- Matthews J. Yoga For Active Older Adults: 6 Accessible Poses to Enhance Functional Capacity. American Council on Exercise (ACE). September 28, 2015., checked Nov 12, 2026
- Yoga International. Warrior II (pose library)., checked Nov 12, 2026
- Ashworth K. Stand Strong in Your True Self: The Mythology and Practice of Reverse Warrior. Yoga International., checked Nov 12, 2026
- Yoga International. Use a Chair to Get More Out of Warrior II., checked Nov 12, 2026
- American Council on Exercise (ACE). 5 Yoga Poses to Strengthen the Shoulders. September 25, 2015., checked Nov 12, 2026
Image credits: Illustration: YogaForFitness (vector figure), drawn from the steps above