- Level: Beginner
- Pose type: Standing · Balance
- Body area: Legs · Ankles · Hips · Core
- Props: wall, chair
Tree Pose (Vrksasana)
Pronounced vrik-SHAHS-ah-nah
Quick answer
From Mountain Pose, move your weight onto one foot and rest the sole of the other foot against the standing leg: heel at the ankle with your toes on the floor, on the calf, or on the inner thigh, but not against the side of the knee. Keep your hips level, look at one still point and hold for 3 to 5 breaths on each side, with a wall or chair within reach.
We may earn a commission when you buy through links on this page. It never changes what we recommend. As an Amazon Associate we earn from qualifying purchases.
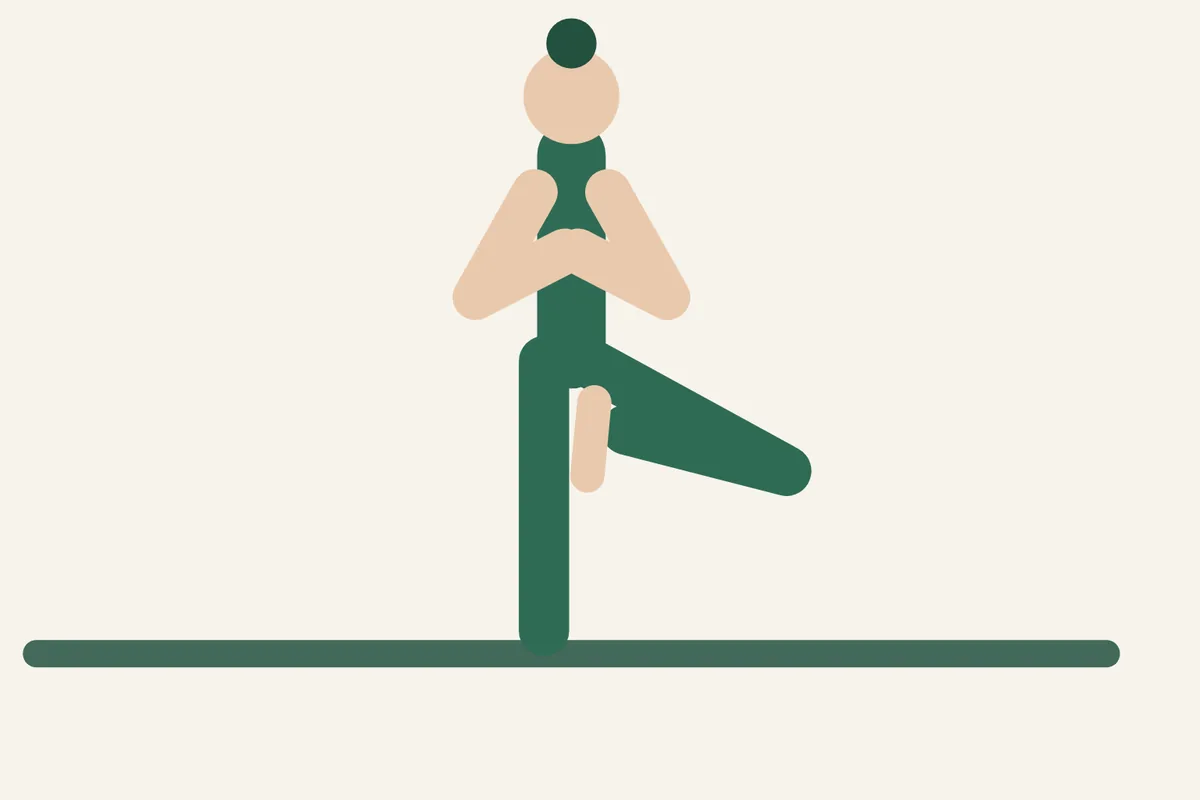
Tree Pose is often the first one-leg balance a yoga class teaches. You stand on one foot, rest the other foot against the standing leg and stay tall while your ankle and hip make small corrections to keep you up. It grows straight out of Mountain Pose: the same tall stance, with one foot taken away.
Swaying is part of the pose, not a sign that you’re doing it wrong. This guide covers the weight shift that makes the balance possible, three heights for the lifted foot, what to do when you wobble, and versions with a wall or a chair. It belongs to our pose library. If you’re new to yoga, start with yoga for beginners and how to start yoga at home.
In this guide
- First, shift your weight onto one foot
- How to do Tree Pose
- Where to put your foot: three heights
- Alignment cues
- Common mistakes
- What to do when you wobble
- Make it easier (props)
- Variations
- Poses to do before and after
- Who should skip it or ask a doctor first
- What the research says
- Frequently asked questions
- Sources
First, shift your weight onto one foot
If you lift a foot while your weight is still shared between both legs, your body tips toward the empty side and you have to catch yourself. So practice the shift as a drill of its own, next to a wall or the back of a sturdy chair.
- Stand in Mountain Pose with your feet about hip-width apart and your hands on your hips.
- Find one spot at eye level that isn’t moving, and keep looking at it.
- Glide your whole body to the left, as one piece, until your left foot carries nearly all of your weight: a few inches if your feet are hip-width apart, less if they are closer. Your head, chest and pelvis all end up above that foot.
- Check that you slid across instead of leaning: your shoulders stay level, and your left hip doesn’t poke out to the side.
- Peel your right heel up so that only the toes touch. If you can lift those toes for a second and nothing else moves, your weight is where it needs to be.
- Come back to the middle and repeat to the right. Go back and forth a few times.
How to do Tree Pose
- Stand in Mountain Pose within reach of a wall or chair, hands on your hips. Fix your eyes on your still point.
- Move your weight over your left foot, as in the drill. Keep your left leg straight, but don’t lock the knee.
- Bend your right knee and lift the heel, with your toes still on the floor. Turn the knee out to the right.
- Bring your right heel against the inside of your left ankle, toes down. This is the kickstand.
- If you feel steady, slide the sole of your right foot up to your inner calf. For the highest position, use your right hand to set the foot on your inner thigh. Skip the knee: the foot goes below it or above it.
- Push the foot and the standing leg against each other equally hard.
- Feel your hip bones under your hands. Keep them level and facing forward, and let your right knee open only as far as it can without turning your pelvis.
- Lengthen upward through the crown of your head. Relax your shoulders and keep breathing.
- Leave your hands on your hips, or press your palms together in front of your chest. If you’re steady, reach your arms overhead.
- Stay for 3 to 5 slow breaths.
- To come out, bring your hands back to your hips, lower your right foot with control and stand on both feet for a breath. Then do the other side, and hold it for as many breaths.
Where to put your foot: three heights
| Height | How | Suits |
|---|---|---|
| Kickstand | Heel against the inner ankle, ball of the foot and toes on the floor | First tries, shaky days, pregnancy, anyone who wants a quick way out |
| Calf | Whole sole on the inner calf, below the knee, toes pointing down | When the kickstand feels easy without touching the wall |
| Inner thigh | Sole on the inner thigh, above the knee, placed with your hand | Hips that turn out easily; you can stay level without the foot sliding |
Higher is not better, and the lower positions are complete versions of the pose. In a lab study of adults around age 70, the freestanding version that the researchers tested had the lifted foot just above the ankle (Yu et al., 2012).
Why not on the knee?
Teaching guides agree. Yoga International sets the foot below or above the knee of the standing leg, YogaEasy says above or below the joint, and the American Council on Exercise describes the ankle and the lower leg under the knee.
The usual reasoning: the knee works like a hinge that opens and closes in one direction, and the ligaments on its two sides are there to limit side-to-side movement (Cleveland Clinic). A foot pressed into the side of the standing knee pushes it in the direction it isn’t built to go.
This is a teaching convention, not a measured risk: we found no study of what a foot against the knee does to the joint, and no injury figures. The rule costs nothing to follow. If your foot keeps sliding down from your thigh toward your knee, use the calf.
Alignment cues
- Standing foot: toes point straight ahead and stay relaxed. Weight is spread between the front of the foot and the heel.
- Standing knee: straight but soft, kneecap facing forward.
- Standing hip: stacked over the ankle. Draw the outer hip in toward the midline so it doesn’t sag sideways.
- Pelvis: both hip bones at one height, pointing forward like a pair of headlights.
- Lifted knee: out to the side only as far as your pelvis allows. It’s fine if it points diagonally forward.
- Trunk: long and upright, lower ribs in, no lean away from the lifted leg.
- Eyes: on one still point, at eye level or on the floor a few steps ahead.
- Breath: slow and even. If you can’t breathe smoothly, lower the foot a level.
Common mistakes
- Foot against the side of the knee. Move it down to the calf or up to the thigh.
- Sinking into the standing hip. When the hip juts out, you hang on the joint instead of holding yourself up. Bring your hip back over your ankle.
- Locking the standing knee. Pushing the knee backward makes the leg stiff. Keep it straight with a hint of softness.
- Forcing the lifted knee back. Cranking the knee open drags the pelvis around with it. Level, forward-facing hips matter more than a wide knee.
- Clawing the floor with your toes. A gripping foot can’t make small adjustments. Spread your toes and let them rest.
- Looking around, or straight down at your feet. Your eyes help you balance. Give them one place to rest. A point on the floor a few steps ahead is fine; your own foot is not.
Watch out for: pain in the standing knee, ankle or hip, or any dizziness. Put your foot down, hold the wall and sit if you need to. If you tend to get lightheaded when you stand up, keep something within reach to hold (MedlinePlus).
What to do when you wobble
Wobbling is normal in this pose. When researchers measured 32 healthy young adults with no yoga experience, their bodies swayed more from side to side in Tree Pose than in plain one-leg standing (Chen et al., 2021). When the sway gets bigger than you like, try these in order:
- Bring your eyes back. Look at your still point again.
- Breathe out slowly and let your shoulders drop.
- Lower your arms. Bring your hands back to your hips.
- Touch down. Tap your toes to the floor in the kickstand, settle, and lift again.
- Use the wall. Rest one or two fingertips on a wall and press lightly. Lean on it only if you need to.
- Drop a level. Thigh to calf, calf to kickstand.
- Check your base. Unlock your standing knee, relax your toes and make sure your hip sits over your ankle.
If you are truly losing your balance, don’t fight for the pose. Put the lifted foot down.
Make it easier (props)
- Fingertips on a wall. Stand side-on to a wall, about an arm’s length away, and rest the fingertips of one hand on it at shoulder height. Press lightly. Either side works; with the lifted knee toward the wall, stand far enough away that the knee doesn’t touch it.
- A chair back. Stand beside a sturdy chair with one hand on its backrest. For more support, stand behind the chair and hold the backrest with both hands, an option the American Council on Exercise describes. A kitchen counter works too.
- Kickstand foot. Keep your toes on the floor the whole time.
- Back against a wall. Stand with your heels a few inches from a wall and let your buttocks and shoulder blades rest on it. The wall catches any backward sway, and your lifted knee can open alongside it.
- A firm floor. Thick carpet and soft mats make one-leg balance harder. Practice barefoot on a firm surface (more in starting yoga at home).
- Can’t stand on one leg safely? See chair yoga for seated options.
Helpful gear for this pose
 Manduka begin yoga mat, 5 mm
5 mm TPE mat, 68 x 24 in, light to carry, with a center alignment stripe (maker's spec).
See it on Amazon Gaiam foam yoga blocks, pair
Two light foam blocks, 9 x 6 x 4 in each, to raise the floor under your hands (maker's spec).
See it on Amazon Hugger Mugger cotton D-ring yoga strap, 10 ft
Cotton webbing 1.5 in wide with a metal D-ring buckle, 10 ft long (maker's spec).
See it on Amazon
As an Amazon Associate we earn from qualifying purchases. How we choose gear
Variations
- Hands on hips. The starting position in most guides, and the easiest way to check that your pelvis is level.
- Palms together at your chest. Press your hands lightly together in front of your breastbone.
- Arms overhead. Reach up with your arms shoulder-width apart, palms facing each other, or bring your palms together. Keep your lower ribs in so your back doesn’t arch. With a sore shoulder, lift only as high as is comfortable.
- Harder: move your gaze. Lift your eyes toward the ceiling, or close them for a breath or two. Do this only next to a wall, and skip it if your balance is unreliable or you get dizzy.
Poses to do before and after
- Start from: Mountain Pose, every time. Stand in it again between sides.
- Warm up your hips: try Low Lunge or a few stretches from yoga for tight hips.
- In a standing sequence: Tree Pose often follows poses such as Warrior II.
- After: fold into Downward-Facing Dog or rest in Child’s Pose.
- Read next: how long to hold a yoga pose and mobility vs. flexibility.
Who should skip it or ask a doctor first
- Balance problems, vertigo, dizziness or earlier falls. The NCCIH names balance issues among the health conditions that may call for changes to a yoga practice. Use a wall or a sturdy chair every time, keep your toes on the floor and your eyes open, and ask your doctor or physical therapist whether one-leg balance work is right for you.
- Low blood pressure, or lightheadedness when you stand up. Dizziness and lightheadedness are symptoms of low blood pressure, and rising slowly from sitting or lying is one way to prevent them (MedlinePlus). After floor poses, stand on both feet for a few breaths before you balance, and keep a hand near your support.
- Older adults and anyone with a fall risk. The NCCIH advises older adults to be particularly cautious, and says yoga injuries treated in emergency departments are more frequent at 65 and older than in younger adults. Balance and walking problems, and blood pressure that drops when you get up, are risk factors for falling (National Institute on Aging). Practice next to a wall, a counter or a sturdy chair that can’t slide. The authors of one lab study of 11 yoga instructors add, as their own recommendation, that practitioners whose standing balance is unsteady should do Tree Pose next to a wall or chair (Liu et al., 2021). With osteoporosis, a fall is more likely to break a bone, so support matters even more.
- Knee, hip or ankle injuries. Knee and hip injuries are on the NCCIH list too. In the lab study of adults around age 70, the one-leg versions of Tree Pose put a sideways load on the standing knee that was higher than the peak load in walking, and holding a wall didn’t lower it. The toes-on-the-floor version produced a smaller load. The authors warned that this load could aggravate existing knee problems (Yu et al., 2012). In a lab study of 20 healthy yoga practitioners, ankle loads were highest in the one-leg poses, Tree Pose among them (Mears et al., 2019). With a current or recent injury, ask your doctor or physical therapist first, and start with the kickstand.
- Hip replacement or other recent surgery. A new hip joint can dislocate if it is moved the wrong way, and you need the most care in the first few months after surgery, MedlinePlus says. Which movements are off limits depends on your operation. Tree Pose lifts one leg and turns it out while the other hip carries all your weight, so ask your surgeon or physical therapist before you try it. After any recent operation, wait for their OK.
- Pregnancy. Get checked by your health care provider before you exercise, the NCCIH says. It also advises against poses that keep you still for a long time. Pregnancy can shift your center of balance and raise the chance of a fall, so you may need extra support for balance activities (Leeds Teaching Hospitals NHS Trust). Use a wall or chair every time, keep the foot low and the holds short. In one supervised session with 25 healthy women in weeks 35 to 37 of pregnancy, 26 poses that included Tree Pose brought no falls or injuries (Polis et al., 2015); the balance poses were done with blocks, chairs or a wall (Harvard Health). One session can’t show that the pose is safe in every pregnancy.
- Numb feet or nerve problems in your legs. Problems with the nerves or feet can affect balance (National Institute on Aging). Hold a support every time, and ask your doctor first.
- Other conditions. Disease of the lower (lumbar) spine, severe high blood pressure and glaucoma are on the NCCIH list as well. Talk with your health care provider first. If you take a class, tell the teacher about any of these; the NCCIH advises learning under a qualified instructor.
What the research says
Evidence: no good evidence
One small trial has tested Tree Pose itself, for balance, and it found no clear effect. A handful of lab studies have measured what the pose asks of the body. We call that no good evidence so far, not evidence that the pose does nothing. We found no study that tested Tree Pose for posture, concentration or the other benefits often claimed for it.
- The one trial. 32 women with osteoporosis after menopause were randomly split into two groups. Both did 30 minutes of conventional exercise a day for 12 weeks, and one group added 2 minutes of Tree Pose a day. The abstract doesn’t give the size of each group. Within each group, scores on four of the balance tests changed significantly over the 12 weeks; the abstract gives no numbers, though the authors’ conclusion speaks of gains. Between the groups, the abstract reports a significant difference on one test only, standing on one leg, at week 6; it doesn’t report one at week 12 (Solakoglu et al., 2022). We could read only the abstract.
- Hips and knees in older adults. Twenty healthy adults around age 70 were measured after months of practicing these versions in a yoga program, holding each for one full breath. Both one-leg versions of Tree Pose loaded the hip muscles that keep the pelvis level about 55% more than the version with toes on the floor. Holding a wall didn’t change that. The sideways load on the standing knee was 8% to 20% above the peak measured during walking (Yu et al., 2012).
- Lower leg more than thigh. In 10 healthy women with yoga experience, the shin and calf muscles were more active than the thigh muscles during Tree Pose, Half Moon and Warrior III (Kelley et al., 2019). In 11 yoga instructors, Tree Pose produced low joint loads and little thigh-muscle activity (Liu et al., 2021).
- Sway. In 32 healthy young adults, Tree Pose brought more side-to-side sway than ordinary one-leg standing, and more activity in a brain area involved in planning movement (Chen et al., 2021). In a comparison of 10 yoga practitioners with 10 people who didn’t practice, the practitioners swayed less in Tree Pose (Pinto et al., 2022). A one-time comparison can’t show that yoga caused the difference.
None of the lab studies followed people over time, so they don’t show that practicing Tree Pose improves balance or prevents falls. For research on yoga programs and balance in general, see benefits of yoga.
Frequently asked questions
How long should you hold Tree Pose?
As a beginner, 3 to 5 slow breaths on each side is plenty. Cleveland Clinic has a beginner flow that holds it for three to five breaths, or as long as feels comfortable, and the American Council on Exercise uses the same range. Later you can build toward the 30 seconds to 1 minute that YogaEasy gives. More on timing: how long to hold a yoga pose.
Why can’t I balance in Tree Pose?
Common causes are lifting the foot before your weight is over the standing leg, eyes that wander, a foot placed higher than your hips allow, a locked knee or a soft floor. Go back to the weight-shift drill and the kickstand. Health matters too. Heart disease, diabetes and problems with the nerves, feet, thyroid or blood vessels are among the conditions that can affect balance (National Institute on Aging). If your balance has become worse, or you feel dizzy, see your doctor.
Is Tree Pose safe for older adults?
It is taught to older adults with support: the American Council on Exercise article above gives a chair version for active older adults. In the lab study of adults around age 70, two of the three versions were done with the hands on a wall (Yu et al., 2012). Stand next to a wall or sturdy chair, begin with the kickstand, and talk to your doctor first if you have had falls, feel unsteady or have osteoporosis. No study we found shows that Tree Pose prevents falls.
Can you do Tree Pose while pregnant?
Ask your doctor or midwife first. If you get the OK, practice next to a wall or chair every time, keep the foot low and the holds short, and stop if you feel dizzy or unwell. The caution box above has the details.
Does Tree Pose improve balance?
We can’t say yet. The only trial, in 32 women with osteoporosis who added 2 minutes of Tree Pose a day to an exercise program, reported a difference from exercise alone on one balance test (standing on one leg) at week 6 and none at week 12 (see the research box above). Research on whole yoga programs is more encouraging. The NCCIH says several newer studies support a benefit for balance in older adults living at home, though such studies can’t tell you what one pose adds. Our benefits of yoga guide goes through them.
Sources
- National Center for Complementary and Integrative Health (NCCIH). Yoga: Effectiveness and Safety. Last updated August 2023., checked Nov 12, 2026
- Solakoglu O, Dogruoz Karatekin B, Yumusakhuylu Y, Mesci E, Icagasioglu A. The Effect of Yoga Asana ‘Vrksasana (Tree Pose)’ on Balance in Patients With Postmenopausal Osteoporosis: A Randomized Controlled Trial. Am J Phys Med Rehabil. 2022;101(3):255-261., checked Nov 12, 2026
- Yu SS, Wang MY, Samarawickrame S, et al. The physical demands of the tree (vriksasana) and one-leg balance (utthita hasta padangusthasana) poses performed by seniors: a biomechanical examination. Evid Based Complement Alternat Med. 2012;2012:971896., checked Nov 12, 2026
- Kelley KK, Giannico K, Lesnett G, Romano A. A comparison of EMG output of four lower extremity muscles during selected yoga postures. J Bodyw Mov Ther. 2019;23(2):329-333., checked Nov 12, 2026
- Liu AM, Chu IH, Lin HT, Liang JM, Hsu HT, Wu WL. Training Benefits and Injury Risks of Standing Yoga Applied in Musculoskeletal Problems: Lower Limb Biomechanical Analysis. Int J Environ Res Public Health. 2021;18(16):8402., checked Nov 12, 2026
- Chen XP, Wang LJ, Chang XQ, et al. Tai Chi and Yoga for Improving Balance on One Leg: A Neuroimaging and Biomechanics Study. Front Neurol. 2021;12:746599., checked Nov 12, 2026
- Pinto DP, Moreira PVS, Menegaldo LL. Postural Control Adaptations in Yoga Single-Leg Support Postures: Comparison Between Practitioners and Nonpractitioners. Motor Control. 2022;26(3):412-429., checked Nov 12, 2026
- Mears SC, Tackett SA, Elkins MC, et al. Ankle motion in common yoga poses. Foot (Edinb). 2019;39:55-59., checked Nov 12, 2026
- Polis RL, Gussman D, Kuo YH. Yoga in Pregnancy: An Examination of Maternal and Fetal Responses to 26 Yoga Postures. Obstet Gynecol. 2015;126(6):1237-1241., checked Nov 12, 2026
- Harvard Health Publishing. Yoga in pregnancy: Many poses are safer than once thought. Harvard Health Blog. December 29, 2015., checked Nov 12, 2026
- Leeds Teaching Hospitals NHS Trust. Movement throughout your pregnancy for health and wellbeing. Patient leaflet, reviewed October 7, 2025., checked Nov 12, 2026
- National Institute on Aging (NIA). Falls and Fractures in Older Adults: Causes and Prevention. Reviewed September 12, 2022., checked Nov 12, 2026
- MedlinePlus (U.S. National Library of Medicine). Dizziness. Reviewed April 1, 2025., checked Nov 12, 2026
- MedlinePlus (U.S. National Library of Medicine). Low blood pressure. Reviewed January 1, 2025., checked Nov 12, 2026
- MedlinePlus (U.S. National Library of Medicine). Taking care of your new hip joint. Reviewed November 7, 2024., checked Nov 12, 2026
- Cleveland Clinic. Knee Joint. Health Library. Last updated July 16, 2026., checked Nov 12, 2026
- Cleveland Clinic. Yoga for Beginners: Get Started Today! Health Essentials. May 18, 2026., checked Nov 12, 2026
- Yoga International. Tree Pose. Pose library., checked Nov 12, 2026
- YogaEasy. Tree Pose. Last modified July 30, 2026., checked Nov 12, 2026
- Matthews J. Yoga For Active Older Adults: 6 Accessible Poses to Enhance Functional Capacity. American Council on Exercise (ACE). September 28, 2015., checked Nov 12, 2026
Image credits: Illustration: YogaForFitness (vector figure), drawn from the steps above